


M12 Circular Connector Installation Guide — Step - by - Step Tutorial
M12 Circular Connector Installation Guide — Step - by - Step Tutorial
Introduction
M12 circular connectors are widely used in industrial automation, sensors, actuators, and fieldbus systems due to their compact design, vibration resistance, and high protection ratings. Correct installation of M12 circular connectors is essential to ensure stable signal transmission, reliable power delivery, and long-term performance in harsh industrial environments.

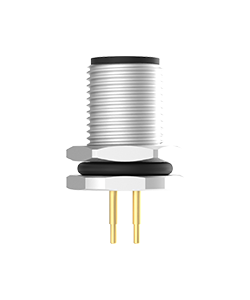
M12 Circular Connectors
Rugged, compact and versatile — ideal when you need mixed power & signal plus environmental protection.
Tools & Materials Needed
Before starting the installation process, make sure all required tools and materials are prepared. Using the correct tools helps prevent wiring errors, connector damage, and performance issues.
Wire stripper and precision cutter
Crimping or soldering tools (depending on connector type)
Torque screwdriver or tightening tool
Industrial-grade cables and M12 connectors
Multimeter for continuity testing

M12 circular connector installation tools
Special installation tools for M12 circular connectors offer convenient and labor - saving operation. They ensure precise alignment and compatibility, enabling easy cable assembly and fastening. These tools improve installation efficiency and are suitable for various industrial construction scenarios.
Step-by-Step Installation Tutorial
Step 1: Prepare the Cable
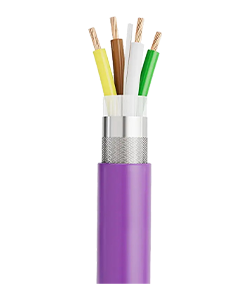
Select a suitable industrial cable and carefully strip the outer jacket to expose the inner conductors. Avoid damaging the insulation or shielding during this process.
Step 2: Strip Individual Wires
Strip approximately 5–7 mm of insulation from each conductor to ensure proper electrical contact with the connector terminals.
Step 3: Insert Wires into Contacts
Insert each conductor into the correct terminal according to the M12 connector pinout and coding. Double-check wire positions before fixing them permanently.
Step 4: Secure and Assemble the Connector
Secure the wires using screw, solder, or crimp termination methods, then assemble the connector housing and tighten it with the recommended torque.

M12 connector installation step by step
Step - by - Step Installation Guide for M12 Connectors. The steps are clear and easy to understand. It ensures precise alignment and secure locking. Even beginners can quickly get the hang of it, guaranteeing stable connections and suiting various industrial assembly scenarios.
Installation Best Practices
Following best practices during installation helps extend the service life of M12 circular connectors and reduces maintenance costs.
Match connector coding with the application requirements
Apply correct torque to prevent loosening or thread damage
Maintain proper cable bend radius to avoid mechanical stress
Ensure seals and O-rings are properly positioned

M12 connector installation best practices
Practical Installation Guide for M12 Connectors. This guide focuses on standardized procedures and key protective points, helping to avoid wiring mistakes, enhance connection stability, and facilitate efficient assembly and long - term durability in industrial settings.
M12 Coding, Pinout & Color Codes
M12 connectors are available in multiple coding types such as A-coded, D-coded, and X-coded. Understanding the correct pinout and color codes is critical for avoiding miswiring and ensuring reliable signal and power transmission.
Conclusion
After installation, always perform continuity testing and visual inspection. Verify that all pins are correctly connected, seals are intact, and the connector is securely fastened before deployment.
What tools are required for the installation of M12 circular connectors?
To properly install M12 circular connectors, you typically need a wire stripper, precision cutter, crimping or soldering tool (depending on the connector type), a torque screwdriver, and a multimeter for testing. Using the correct tools ensures reliable electrical connections and prevents damage to the connector or cable.
What are the key steps in an M12 circular connector installation guide?
A standard M12 circular connector installation guide includes cable preparation, stripping individual conductors, inserting wires according to the correct pinout, securing the contacts, assembling the connector housing, and performing final continuity and visual checks. Following these steps helps ensure stable performance and long service life.
How do shielded M16 connectors differ from unshielded ones in performance?
Correct pinout and coding (such as A-coded or D-coded) are critical because each M12 connector type is designed for specific signal, data, or power applications. Incorrect wiring or mismatched coding can cause signal errors, equipment malfunction, or connector damage.
What are common mistakes during the installation of M12 circular connectors?
Common installation mistakes include incorrect wire placement, insufficient or excessive tightening torque, damaged cable insulation during stripping, and improper sealing. These issues can lead to poor signal quality, loose connections, or moisture ingress in industrial environments.

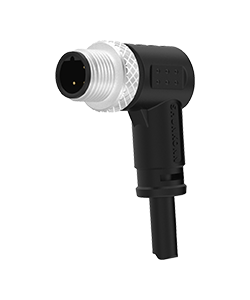
M16 6 Pin Circular Connector A-Code Interface, Waterproof Connector Receptacle Cable, Straight, Front-Locking, Unshielded

M16 6 Pin Circular Connector assemblies are ideal for demanding industrial applications such as industrial automation and aerospace, marine, and telecom systems.

M16 6 Pin Circular Connector are ideal for demanding industrial applications such as industrial automation and aerospace, marine, and telecom systems. M16 Circular Connector are available in quick-lock wiring assembly types with IP67 protection and a vibration-resistant screw design.

M16 6 Pin Circular Connector are ideal for demanding industrial applications such as industrial automation and aerospace, marine, and telecom systems. M16 Sensor connector are available in quick-lock wiring assembly types with IP67 protection and a vibration-resistant screw design.

